
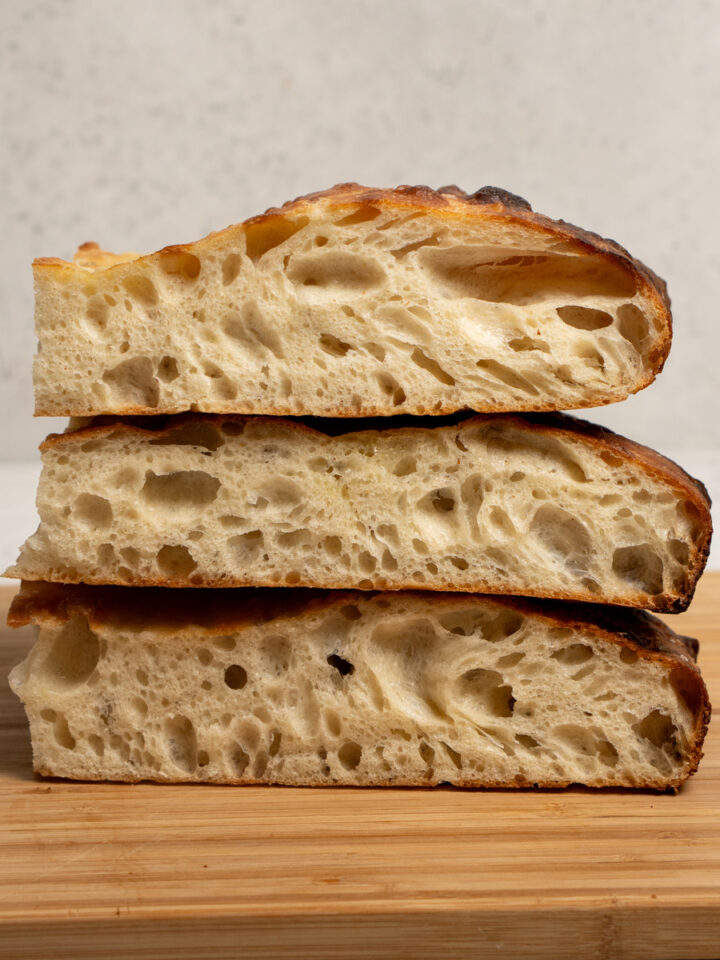
Schiacciata is a Tuscan bread, similar to focaccia. It's crunchy on the outside, and soft and moist on the inside. Great for making sandwiches or even eating on its own, you'll be making it over and over again!
Also known as "ciaccia" or "schiaccia," schiacciata is a common street food in Tuscany. Depending on where you're eating it in Tuscany, the version will vary. In some areas it is thinner and crispier, and it some areas it is slightly thicker and more moist.
In fact, a survey was carried out in 2014 by the region of Tuscany to find out how many versions of schiacciata exist in Tuscany. The survey determined that there were 617 different versions (and even names!) for schiacciata. Some fluffy, some flat, some with less or more salt, some higher than others, some flatter...you get the idea!
This version is a soft and moist version - ideal for filling with ingredients and making delicious panini like this prosciutto panino, mortadella panino, pancetta panino, or porchetta panino!

Behind the name
The word "schiacciata" translates to "squashed." This is because the dough is "squashed" into a pan with the tips of the fingers - this is how the schiacciata is formed and gets its shape.
Difference between focaccia and schiacciata
First - the region in which they originate. Schiacciata originates from Tuscany, while focaccia can originate in Bari (topped with tomatoes and olives), or the famous focaccia Genovese, from Genoa (Liguria).
Depending on the type of focaccia referred to, a focaccia is generally thicker and higher than a schiacciata. A schiacciata dough (at least the one used in this recipe) has a high hydration percentage, making it slightly harder to spread out in the pan than a focaccia. Due to its high hydration, a schiacciata has large, open crumb in the dough once baked.

How to make it
Make the Poolish
Let the yeast bloom - about 10 minutes (photo 1)
Once yeast has bloomed, add the flour in. Mix everything together with a wooden spoon or spatula (photos 2-3) Cover the bowl with saran wrap and place in the fridge for about 16 hours.
Make the dough
Remove the poolish from the fridge – it should have doubled in volumE (photo 4)
Transfer the poolish to a larger bowl. Add the water and sugar (photo 5)
Add the flour (photo 6) and mix again until well incorporated.

Add the olive oil and salt and mix one more time.
While the dough is still in the bowl, fold the dough (photo 7) This helps to develop gluten and give structure to the dough.
Cover the bowl with saran wrap and let it rest for 30 minutes at room temperature.
After 30 minutes, repeat the dough folding technique one more time. Cover the bowl and let it rest and rise at room temperature for 2 hours (photo 8)
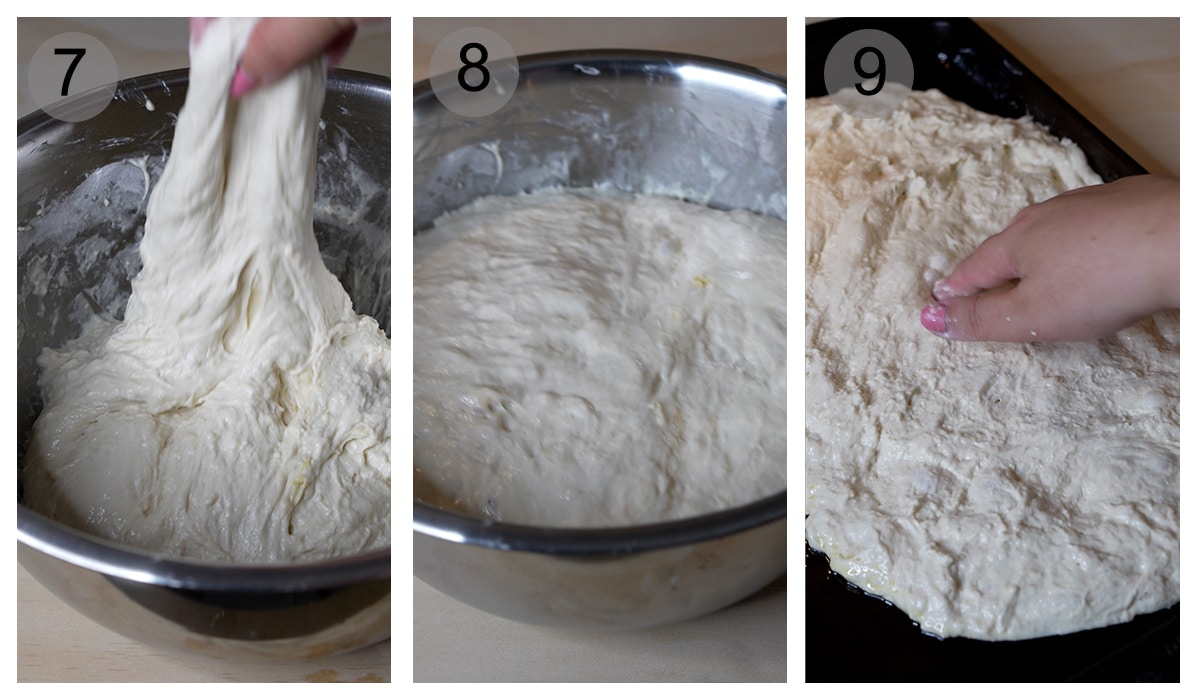
Place the dough on to an oiled baking sheet. Use your fingertips to form the dough to the shape of the pan (photo 8) Let it rise 1 more hour in the pan.
Preheat oven to 425F. Drizzle olive oil on the schiacciata and top with more salt (photo 10)
Place the schiacciata in the oven and bake until golden brown - about 30 minutes (photo 11)
Remove from the oven and let the schiacciata cool slightly until it's cool enough to handle. Cut and enjoy!

Storing
The schiacciata will last for 2-3 days at room temperature. If you have leftovers, store it in an airtight container or wrap in aluminum foil, and keep at room temperature. You can warm it up in the oven when ready to use again, or eat it as-is.
It can also be frozen (wrap in saran wrap then aluminum foil) - and kept in the freezer for up to 2-3 months. When ready to eat, thaw at room temperature.
More Italian bread recipes
If you’ve tried making this Schiacciata recipe, or any other recipe on the blog please let me know what you thought of it in the comments below, I love hearing from you! You can also FOLLOW ME on INSTAGRAM, FACEBOOK, TWITTER, PINTEREST and TIKTOK to see more delicious food and what I’ve been up to.
Recipe

Schiacciata
Equipment
- 1 baking sheet 17x12 inches
Ingredients
For the Poolish
- 1 tsp (5g) traditional active dry yeast
- 320 mL water room temperature
- 2 ¼ cup (320 g) all purpose flour
For the Dough
- 350 mL water room temperature
- 1 teaspoon granulated sugar
- 3 ½ cup (480g) all purpose flour
- 2 tablespoon extra virgin olive oil plus more for drizzling
- 2 tablespoon salt see notes
Instructions
Make the Poolish
- To a bowl, add the water and yeast. Mix it around. Wait for the yeast to bloom (rise to the top of the water) - about 10 minutes.
- Once yeast has bloomed, add the flour in two batches. Mix everything together with a wooden spoon or spatula every time the flour is added. The poolish should be a liquid and creamy texture. Cover the bowl with saran wrap and place in the fridge for about 16 hours.
Make the dough
- Remove the poolish from the fridge - it should have doubled in volume.
- Transfer the poolish to a larger bowl. Add the water and sugar and mix with a spatula until water is incorporated into the poolish.
- Add the flour and mix again until well incorporated.
- Add the olive oil and salt and mix one more time.
- While the dough is still in the bowl, fold the dough. Work your way around the dough like you are looking at clock - you want to perform a fold at 12, 3, 6 and 9 o'clock. Pull the dough up and over to the other side of the bowl.Repeat 4 times as you move around the dough. This helps to develop gluten and give structure to the dough.
- Cover the bowl with saran wrap and let it rest for 30 minutes at room temperature.
- After 30 minutes, repeat the dough folding technique one more time. Cover the bowl and let it rest and rise at room temperature for 2 hours.
- Oil a baking sheet and place the dough on to the baking sheet. Use your fingertips to form the dough to the shape of the pan. Let it rise 1 more hour in the pan.
- Preheat oven to 425F. Drizzle olive oil on the schiacciata and top with more salt.
- Place the schiacciata in the oven and bake until golden brown (about 30 minutes).
- Remove from the oven and let the schiacciata cool slightly until it's cool enough to handle. Cut and enjoy!
Recipe Video
Recipe Notes
- Kosher salt was used in this recipe - it is the least salty of most types of salt. If you are using a different type of salt in this recipe, you may have to reduce the amount of salt used.
- The size of the pan used is 17x11.5 inches

Paris says
Excellent! I've made this bread twice for the Mortadella Sandwich, the second time with 1 tbsp less salt. The poolish gives it a great flavor, and I love that the dough is folded in the bowl instead of turning it out onto the countertop. Love this recipe. Thank you, Pina.
Pina says
Hi Paris! I'm so glad you liked it. It was a lot of work to get the recipe right, so it's so nice to see people enjoying it!
-Pina
Dirk Simons says
Baked this morning you're schiacciate bread.
Wow, real delicious. Felt we are back in Italy again.
Make a "sandwich" filled with porchetta, burrata and pecorino........
Unfortunately I can't send a picture of it
Pina says
Dirk! I am so glad you liked it and that sandwich sounds delicious!
-Pina
Albert says
if i use a convection oven should i lower the temp to 400 vs the 425 you do?
Pina says
Hi Albert! I haven't tried it that way, but I believe that would work. You may need to bake for an extra 5 mins or so, but just monitor it and take it out when it's a warm golden color!
Lynne says
I made this last weekend, and it tasted great, but it didn't get the open texture that you show in the pictures. I'm thinking it had to do with the rise in the pan - I had it covered with saran wrap that laid directly on the dough. Does the dough need something on top for that rise? Is there a better way to cover it without saran wrap directly on top? Thank you!
Chris V says
Hi! I have had great success laying Saran Wrap directly on the dough when it is rising in the pan. Just make sure to put olive oil on the side of Saran Wrap that comes into contact with the dough.
Julian says
Hello, i try this recipe, but the foccacia is almost for six sandwiches and they are very heavy almost 200 grams, i think will be good with a little less flour, arround 450 grams flour for pan 40x30,we can mix bread flour manitoba type 0 350 w with 00 260 w
Pina says
Thanks Julian! I was using North American all purpose flour, so I think the difference in flours used can contribute to the bread being heavy.
Thanks for trying the recipe! -Pina
Will says
Hi there! Looking forward to trying this out on the weekend. What size baking tray is best for this recipe?
Thanks!
Pina says
Hi Will! The size of the pan used is 17x11.5 inches
Let me know how it turns out!
Pina
Julie says
Hi!
traditional active dry yeast means not the rapid rising right? Could I use the rapid one? Would I need to adjust anything?
Ally says
In the process of making this now and I have a question!
During the final rise on the baking pan, should the dough be covered?
Thank you for sharing this recipe!
Clara says
Came out too hard. We couldn't eat it.
Kavita says
I’ve made this a couple of times! Excellent recipe..great flavor. Love it
Dave Bray says
I’ve made this several times over the past year. My teenage son loves it, we like to make burrata and prosciutto sandwiches.
Pat says
Greetings from Thailand!
Was in search of a fool-proof recipe for schiacciata and found this blog.
Tried this today (of course the poolish was done a day before). It worked soooo well 🙂 and reminded me of the schiacciata I had in Florence. Thank you sooo much for sharing the recipe.
It’s my first time making bread. My dough was wet and I freaked out a little. However, coming back to check from video, it seemed alright 🙂 though my dough looked a bit less ideal.
Anyways, the bread is crunchy on the outside, soft but not so fluffy on the inside. Perfect for any sandwich! Again, thank you for sharing your recipe!
Jasson says
Very nice recipe chef . I made it and is excellent. Thank you for your effort
Pina Bresciani says
Thanks Jason! So glad you enjoyed it.
Daniella says
Ciao Pina,
Can I leave the polish in fridge for 36 hours?
Grazie
Pina Bresciani says
Hi Daniella! I think that should be ok! Although I haven't tried it, so can't say for sure.
-Pina
Thoraya says
Good evening
Thank you for this beautiful recipe
I want to ask more about the flour
Can you please share with me the same one you used the company name and picture .
Best wishes
Pina Bresciani says
Hi Thoraya! Sure, I live in Canada so I use Robin Hood All Purpose flour.
Here is a listing for the flour and when you click you will also see the photo.
I hope that helps! Let me know if you have any other questions.
-Pina
Lenny says
This is the third recipe I've tried for schiacciata, and it gave me the best result so far,
but I did find the dough was a little too hydrated (I used a strong bread flour). Do you happen to have weights for the recipe?
Pina Bresciani says
Hi Lenny, all the weights for the flour are in the recipe. I call for all purpose flour in my recipe, so the type of flour used could be the issue. Maybe try with all purpose flour, and see if that gives you a better result?
Hope that helps and happy to answer any other questions.
-Pina
Lenny says
Don't know how I missed that! Thanks
Marin says
A really easy, delicious & amazing recipe! It worked out perfectly without any issues. Just make sure you bake it in the suggested baking pan size, especially if you plan to make sandwiches. It’s the perfect thickness & holds fillings well, as the bread doesn’t fall apart when eating. Thank you Pina!
Pina Bresciani says
Hi! I'm so glad you liked it.
-Pina