
This limoncello cake with raspberry filling makes a true statement at any event! Made of 3 layers of limoncello sponge cake, raspberry sauce, and refreshing limoncello buttercream, it's the perfect spring/summer cake!

Limoncello and raspberry. Nothing says spring and fresh like this flavor combination. And what better way to use the two flavors than in a cake?
This limoncello cake with a raspberry filling is the perfect layer cake for a special occasion like a birthday, shower or anniversary. In fact, I made this cake for my 31st birthday and everyone loved it! It was the best way to celebrate - making a beautiful cake and eating it with friends and family.

What is in this Limoncello Cake?
It's made up of a few main components:
- 3 layers of limoncello sponge cake
- Limoncello swiss meringue buttercream between the layers and to cover the exterior of the cake
- Raspberry sauce between the cake layers

How to Make this Limoncello Cake - Step by Step
Make the 3 limoncello cakes:
Preheat oven to 350°F. Butter 3 x (8-inch) round cake pans, then flour the pans. In a stand mixer with the wire whisk, beat butter and sugar together until fluffy (photo 1)
In another large bowl, combine flour, baking powder, baking soda, salt, and zest. Add flour mixture to butter mixture in stand mixer in thirds, alternating with milk, beginning and ending with flour mixture. Add limoncello, beating until smooth (photo 2)
In a separate mixing bowl using a hand mixer, beat egg whites until stiff peaks form (photo 3)
Fold egg whites into batter (photo 4)
Divide batter evenly among prepared pans (photo 5)
Bake until a wooden pick inserted in center comes out clean, 18 to 22 minutes. Let cool in pans for 10 minutes (photo 6)
Remove from pans, and let cool completely on wire racks.

Make the Raspberry Sauce:
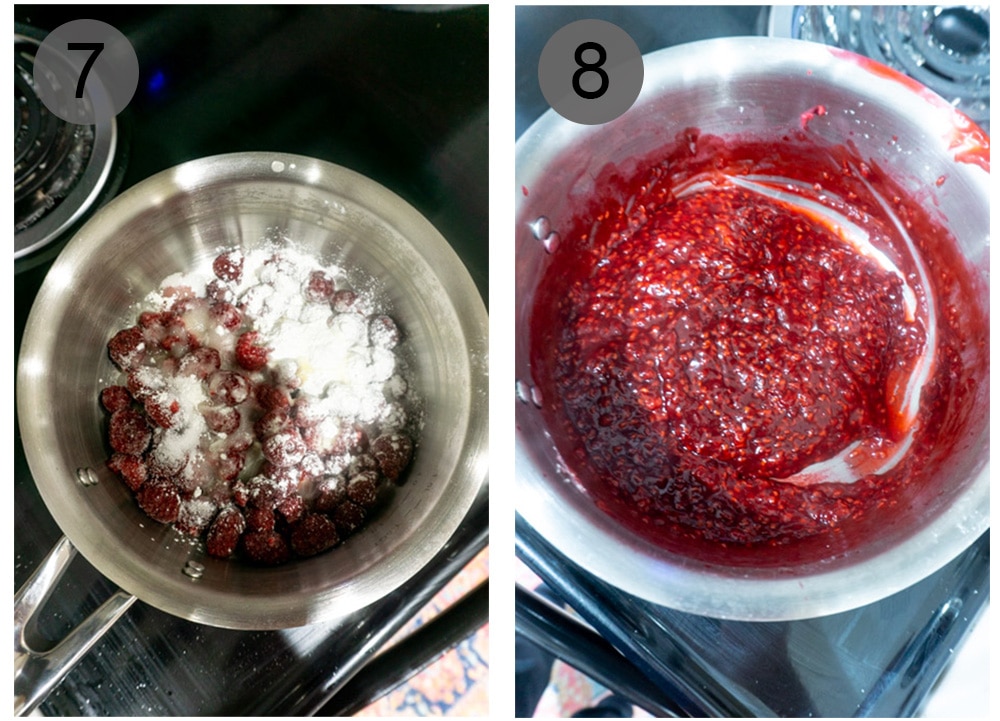
While cake is in the oven, combine all filling ingredients in a small saucepan set over medium heat (photo 7)
Bring to a simmer, stirring constantly, and simmer until mixture is very thick and clings to a wooden spoon (about 10 minutes). Scrape into a small bowl and refrigerate until cool enough to spread (photo 8)
Make the Limoncello Buttercream:
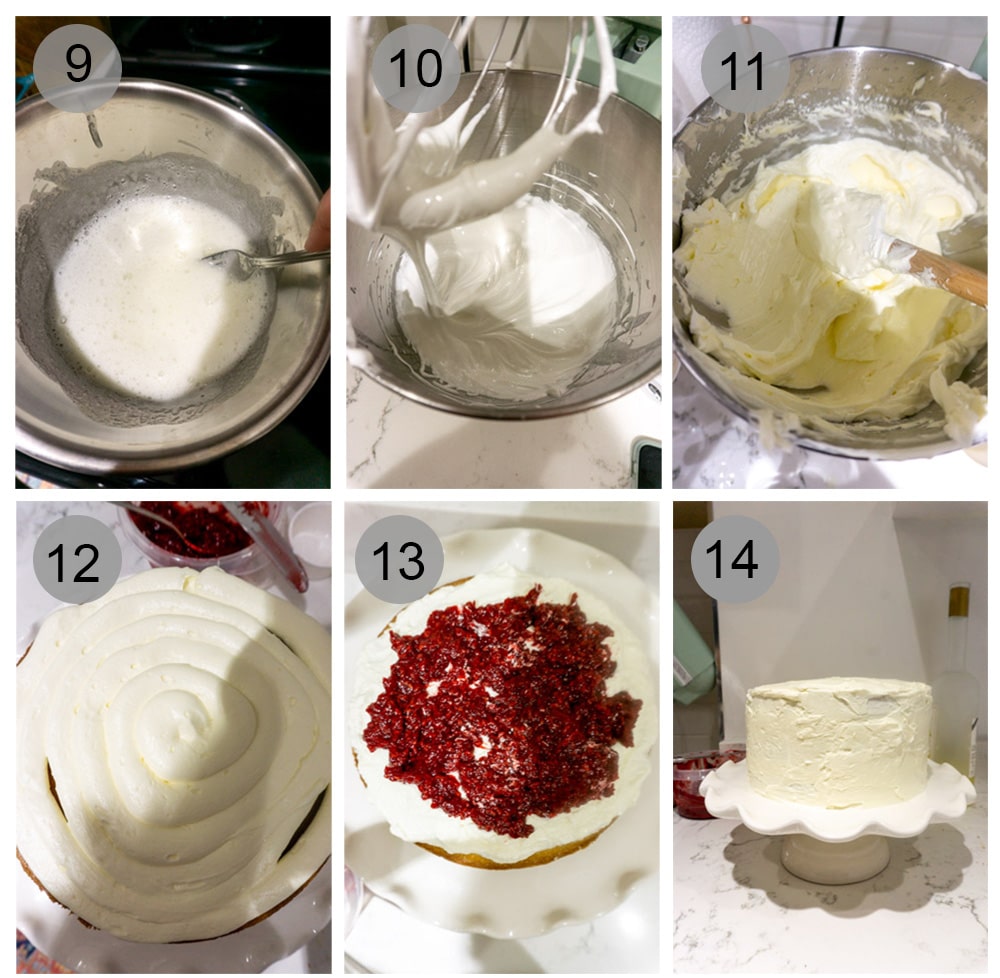
Combine the sugar and egg whites in a medium heatproof bowl and place over a pan of simmering water. Whisk the sugar mixture constantly over heat until the sugar is dissolved and the mixture looks smooth and shiny, about 3 minutes (photo 9)
Remove mixture from heat and pour into a stand mixer bowl. Whisk on medium speed for about 5 minutes until the mixture has cooled and stiff peaks have formed (photo 10)
Switch to the paddle attachment and with the speed on low, add the butter a few pieces at a time, beating until smooth.
When all the butter has been added, beat the buttercream on medium-high speed for about 6-10 minutes until it is very thick and smooth. Add in the limoncello and beat until combined. Add in the lemon extract (photo 11)
Assemble the cake:
Level the cakes by cutting off the rounded tops.
Place one layer of cake on a cake stand or serving dish. Pipe ¼ of the buttercream (photo 12), then smooth out the buttercream with a spatula.
Top the buttercream with ½ of the raspberry sauce (photo 13) Top with the next layer of cake and repeat.
Place the third and final cake on top, and cover the entire cake with remaining buttercream (photo 14). Decorate as you wish, with fresh fruit, fresh flowers, or both.
Top Tips to Make this Limoncello Cake with Raspberry Filling:
- Use the buttercream to assemble the cake as soon as the buttercream is ready - if you wait too long, it will be hard to work with.
- Measure the butter for the cakes and buttercream with the markers on the package of butter. If you cut up the butter and use a measuring cup, you will not get an accurate measurement and your buttercream will be runny.
- Level the cake tops to ensure your cake turns out even, and it's easier to stack this way as well.
- When stacking the second layer of cake, turn it upside down, (the bottom of the cake will become the top), and place it on top of the buttercream/raspberry sauce. This helps to ensure a more even shape for the cake. Do this for the 3rd layer as well.
- This cake did not require a crumb coat, since it's not a crumbly cake.

If you’ve tried making this Limoncello Cake with Raspberry Filling, or any other recipe on the blog please let me know what you thought of it in the comments below, I love hearing from you!
Recipe

Limoncello Cake with Raspberry Filling
Ingredients
Limoncello Cake
- 1 cup unsalted butter, at room temperature
- 2 cups sugar
- 3 cups all purpose flour
- 1.5 teaspoon baking powder
- 1 tsp baking soda
- 1 teaspoon salt
- zest of one lemon about 1 tbsp
- 1 cup whole milk
- 2 tablespoon limoncello
- 4 large egg whites
Raspberry Sauce
- 3 cups frozen raspberries
- ⅓ cup sugar
- 3 tablespoon lemon juice
- 2 tablespoon corn starch
Limoncello Buttercream
- 2 cups sugar
- 8 large egg whites
- 3 cups butter, at room temperature
- ¾ cups limoncello
- 2 teaspoon lemon extract
Instructions
Make the limoncello cake
- Preheat oven to 350°F. Butter 3 x (8-inch) round cake pans, then flour the pans.
- In a stand mixer with the wire whisk, beat butter and sugar together until fluffy.
- In another large bowl, combine flour, baking powder, baking soda, salt, and zest.
- Add flour mixture to butter mixture in stand mixer in thirds, alternating with milk, beginning and ending with flour mixture. Add limoncello, beating until smooth.
- In a separate mixing bowl using a hand mixer, beat egg whites until stiff peaks form. Fold egg whites into batter.
- Divide batter evenly among prepared pans.
- Bake until a wooden pick inserted in center comes out clean, 18 to 22 minutes. Let cool in pans for 10 minutes. Remove from pans, and let cool completely on wire racks.
Make the raspberry sauce
- While cake is in the oven, combine all filling ingredients in a small saucepan set over medium heat. Bring to a simmer, stirring constantly, and simmer until mixture is very thick and clings to a wooden spoon (about 10 minutes). Scrape into a small bowl and refrigerate until cool enough to spread.
Make the Limoncello Buttercream
- Combine the sugar and egg whites in a medium heatproof bowl and place over a pan of simmering water.
- Whisk the sugar mixture constantly over heat until the sugar is dissolved and the mixture looks smooth and shiny, about 3 minutes.
- Remove mixture from heat and pour into a stand mixer bowl. Whisk on medium speed for about 5 minutes until the mixture has cooled and stiff peaks have formed.
- Switch to the paddle attachment and with the speed on low, add the butter a few pieces at a time, beating until smooth.
- When all the butter has been added, beat the buttercream on medium-high speed for about 6-10 minutes until it is very thick and smooth. Add in the limoncello and beat until combined. Add in the lemon extract. Use to layer the cake right away, as the buttercream will be easier to work with.
Assemble the cake
- Level the cakes by cutting off the rounded tops.
- Add buttercream to a piping bag fitted with a tip.
- Place one layer of cake on a cake stand or serving dish. Pipe ¼ of the buttercream, smooth out the buttercream with a spatula, then top the buttercream with ½ of the raspberry sauce. Top with the next layer of cake and repeat.
- Place the third and final cake on top, and cover the entire cake with remaining buttercream. Decorate as you wish, with fresh fruit, fresh flowers, or both.
Recipe Notes
- Use the buttercream to assemble the cake as soon as the buttercream is ready - if you wait too long, it will be hard to work with.
- Measure the butter for the cakes and buttercream with the markers on the package of butter. If you cut up the butter and use a measuring cup, you will not get an accurate measurement and your buttercream will be runny.
- Level the cake tops to ensure your cake turns out even, and it's easier to stack this way as well.
- When stacking the second layer of cake, turn it upside down, (the bottom of the cake will become the top), and place it on top of the buttercream/raspberry sauce. This helps to ensure a more even shape for the cake. Do this for the 3rd layer as well.
- The best way to add the buttercream to the layers of the cake is to pipe it. This will ensure you get a thick amount of buttercream on the layer, and that the amount of buttercream is the same on each layer.
- When spreading the raspberry sauce, don't spread it to the edge of the cake. This will ensure that the raspberry sauce doesn't bleed into the outer layer of the cake.
- This cake did not require a crumb coat, since it's not a crumbly cake.
Amy says
I love this idea. I am going to make this exact cake for myself for my birthday. It sounds delicious and I deserve this cake. I love your story about how you spent time in Italy and in Vancouver and both are so much a part of who you are. I am pinning and sharing this recipe. I found you in Everything Foodies and can't wait to check out some more of your posts.
Pina says
Thank you so much Amy! I agree- it's important to to treat yourself, especially for your birthday! Thank you for the words of encouragement, from one food blogger to another!