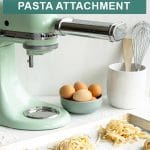
Say bye to your traditional pasta machine! This recipe uses the KitchenAid attachment to make homemade pasta, and it makes this seemingly intimidating process and easy one!
There's just something about homemade pasta that makes it better than store-bought, packaged pasta. Maybe it's the fact that you've put effort into it, and made it with your own hands. Whatever it is, it's so satisfying to make, and eat!
This recipe for fresh pasta dough uses the KitchenAid pasta attachment as opposed to a traditional pasta machine, and the results are fabulous.
Kitchen Aid Pasta Attachment vs. Traditional Pasta Machine
I think the Kitchen Aid pasta attachment is a better choice than a traditional pasta machine for a few reasons:
A pasta machine needs to be clamped to a table with a straight edge, which might not always be an option. Instead making pasta with the Kitchen Aid attachment can be done anywhere (as long as you have electricity).
With a hand crank machine, you only have one hand free to handle the sheet of pasta, since your other hand will be cranking. Since the KitchenAid is mechanized, it allows you to have two hands free to handle the pasta sheet. This is a GAME CHANGER. It allows you more control when feeding the sheet through, ensuring the sheets don't stick or rip. You can also make longer sheets of pasta if you'd like.
Let's talk flour
In this recipe, I used all purpose flour because it's the most common and easiest to find, and chances are, you already have it in your pantry. It also makes a great, silky and smooth pasta dough.
However, a very traditional Italian homemade pasta dough calls for two types of flour: about 60% 00 flour and 40% semolina flour. Semolina flour is a bit coarser than most flours and adds a grittiness and texture to the dough. If you'd like, you can substitute 00 flour and semolina flour for the all purpose flour called for in this recipe.
Drying pasta
If you are cooking the pasta right away, as soon after you make it, you do not need to dry the pasta. Just keep it in its nest shape and throw the nest in once your pasta water is boiling.
How to store
If you would like to dry the pasta out, simply sprinkle it with flour and use a pasta drying rack to dry it out for 12-24 hours. It should snap when you twist it and not bend. You can then store it in an airtight container at room temperature.
You can also freeze the pasta (without drying it out). Lightly flour the nests and place them in a ziplock bag and store in the freezer for up to one month.
How to make it
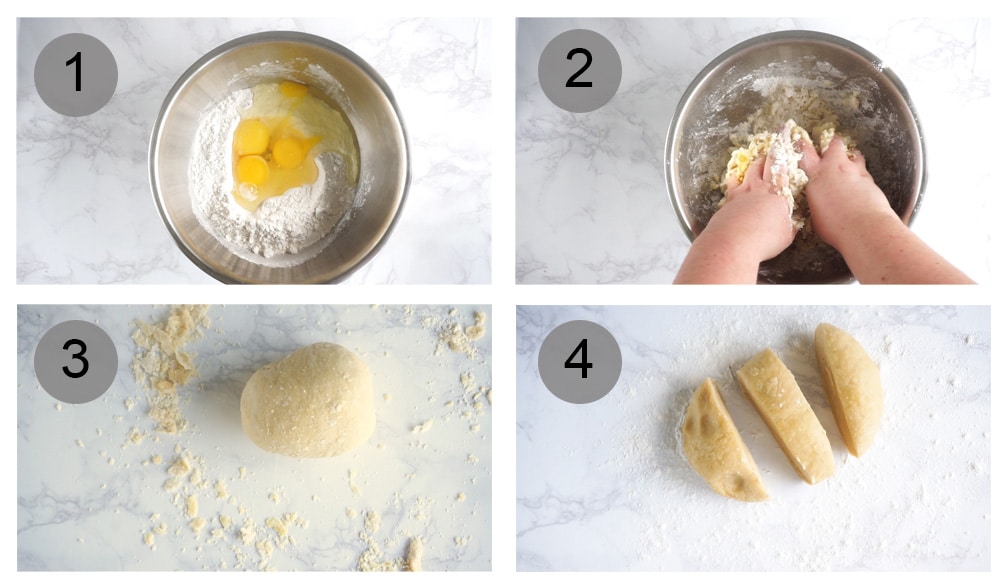
In a mixing bowl, add flour. Make a well in the center of the flour and add the eggs. Add the eggs, salt and olive oil (photo 1)
In the bowl, start mixing the ingredients together with your hands, about one minute (photo 2)
Once you have a work-able "ball," that holds together (it will still be crumbly at this point), transfer the dough to a working surface, whether that's a table, or a wooden board.
On your working surface, knead the dough until it's yellow in colour and holds together nicely, about 10 minutes (photo 3)
Form dough into a ball and wrap in saran wrap and let it rest at room temperature for 30 minutes.
Attach your pasta roller attachment to the power hub of your KitchenAid stand mixer.
On a lightly floured surface, cut your ball of pasta dough into 3 equal-sized pieces (photo 4) Flatten each piece with your hands.
Lightly flour your hands. On speed 2 and setting 1 on the pasta roller, feed one piece of flattened dough through the roller. Once it has gone through, fold the dough into 3, rotate and feed through again. Rotating the dough is what makes it rectangular in shape. Repeat this process two more times until you've fed all sides of the dough through at setting 1 (photo 5)
Now change your roller setting to 2 and feed the dough through the roller once. Keep flouring your hands if dough is sticky.
Keep feeding the dough through on each roller setting (only once) until you've reaching setting 7. I found this was a good thickness for fettuccine. Set your dough sheet aside on a floured surface and sprinkle with a bit more flour. Repeat these steps for the remaining pieces of dough (photo 6)
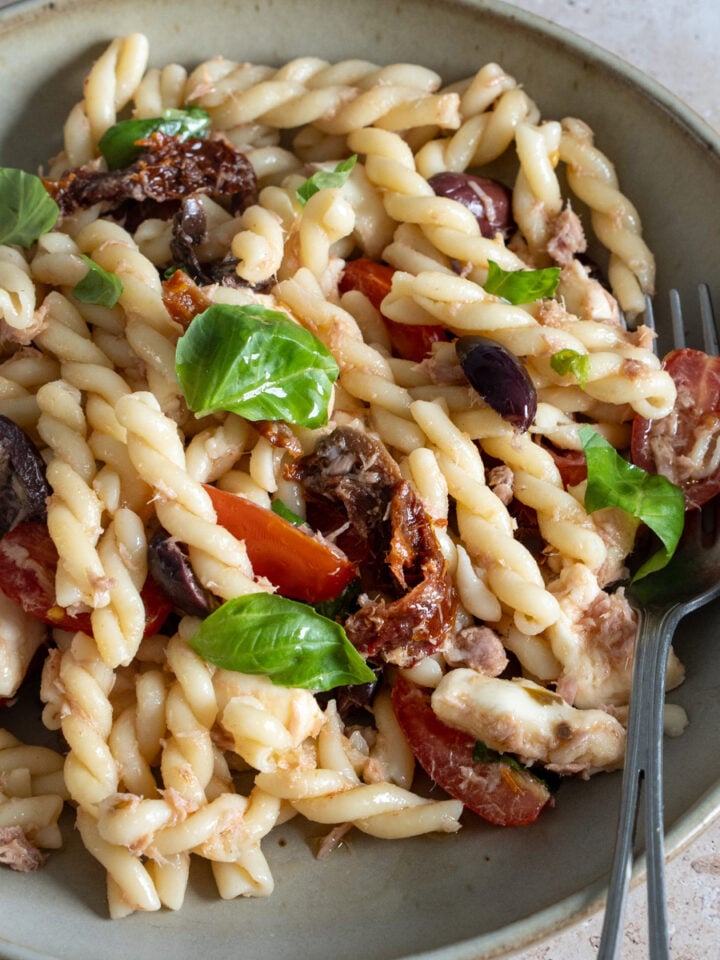
You now have basic, work-able pasta dough sheets! You can make spaghetti, fettucine, ravioli. tortellini, whatever you want from this dough.
Grab a sheet of pasta dough and cut it into about 3 equal pieces. If you feed the whole sheet through without cutting, your fettuccine will probably be too long to eat.
Add the fettuccine or spaghetti attachment to the power hub of your KitchenAid stand mixer. On speed 2, feed the pasta dough sheet through (photo 7)
On a floured baking sheet, place each set of fettuccine/spaghetti on the baking sheet into a pile or "nest" shape. Sprinkle with more flour (photo 8)
Top tips
This recipe will serve 4 people, but if you want to make more or less pasta dough, a general rule of thumb to follow is: use 1 egg per 100 grams of flour. Ie. if you use 500g of flour, use 5 eggs.
If you can, when you're kneading your dough, knead on a surface that's room temperature like a table or large wood cutting board. I've heard that if you knead on a cold surface like marble or quartz, the dough won't turn out as well.
Kneading this dough takes me about 10 minutes, but depending on your strength, it could be more or less time. When kneading, you will notice that there's always an "open" side to the dough, where the dough looks like it's cracking and about to open. Try to keep this open side face up when you're kneading.
If you’ve tried making this KitchenAid Pasta Recipe, or any other recipe on the blog please let me know what you thought of it in the comments below, I love hearing from you! You can also FOLLOW ME on INSTAGRAM, FACEBOOK, TWITTER, AND PINTEREST to see more delicious food and what I’ve been up to.
KitchenAid Pasta Recipe (Foolproof Homemade Pasta)
Making fresh, homemade pasta dough isn't hard! This simple recipe takes the guesswork out of making the dough, and using the KitchenAid pasta attachment makes it extra easy.
300g all-purpose flour, plus extra flour for handling the dough
3eggs
1 teaspoonolive oil
pinch of salt
Instructions
To make the pasta dough
In a mixing bowl, add flour. Make a well in the center of the flour and add the eggs. Add the eggs, salt and olive oil.
In the bowl, start mixing the ingredients together with your hands, about one minute.
Once you have a work-able "ball," that holds together (it will still be crumbly at this point), transfer the dough to a working surface, whether that's a table, or a wooden board.
On your working surface, knead the dough until it's yellow in colour and holds together nicely, about 10 minutes.
Form dough into a ball and wrap in saran wrap and let it rest at room temperature for 30 minutes.
To make the pasta sheets with the KitchenAid pasta attachment
Attach your pasta roller attachment to the power hub of your KitchenAid stand mixer.
On a lightly floured surface, cut your ball of pasta dough into 3 equal-sized pieces. Flatten each piece with your hands.
Lightly flour your hands. On speed 2 and setting 1 on the pasta roller, feed one piece of flattened dough through the roller. Once it has gone through, fold the dough into 3, rotate and feed through again. Rotating the dough is what makes it rectangular in shape. Repeat this process two more times until you've fed all sides of the dough through at setting 1.
Now change your roller setting to 2 and feed the dough through the roller once. Keep flouring your hands if dough is sticky.
Keep feeding the dough through on each roller setting (only once) until you've reaching setting 7. I found this was a good thickness for fettucine. Set your dough sheet aside and repeat these steps for the remaining pieces of dough.
You now have basic, work-able pasta dough sheets! You can make spaghetti, fettucine, ravioli. tortellini, whatever you want from this dough.
To make fettuccine or spaghetti:
Grab a sheet of pasta dough and cut it into about 3 equal pieces. If you feed the whole sheet through without cutting, your fettuccine will probably be too long to eat.
Add the fettucine or spaghetti attachment to the power hub of your KitchenAid stand mixer. On speed 2, feed the pasta dough sheet through.
On a floured baking sheet, place each set of fettuccine/spaghetti on the baking sheet into a pile or "nest" shape.
Recipe Video
Recipe Notes
Extra all purpose flour is required at many stages of the pasta making process so that it doesn't stick together. Add flour to the pasta sheets once you've rolled them out and placed them aside, on a floured surface as well. Add flour to fettuccine or spaghetti once you've formed them into a nest shape.
Nutrition Facts
KitchenAid Pasta Recipe (Foolproof Homemade Pasta)
Amount Per Serving
Calories 330Calories from Fat 36
% Daily Value*
Fat 4g6%
Saturated Fat 1g6%
Cholesterol 122mg41%
Sodium 48mg2%
Potassium 125mg4%
Carbohydrates 57g19%
Fiber 2g8%
Protein 11g22%
Vitamin A 180IU4%
Calcium 30mg3%
Iron 4.1mg23%
* Percent Daily Values are based on a 2000 calorie diet.
Thanks for the tip about kneading on a room temperature surface - this made a big difference to my pasta which I would normally work on a marble countertop. Took less time and effort to get to the right consistency.
Thanks so much for sharing amazing pasta recipe! I love homemade pasta but I’ve never made it home but have eaten homemade and it’s so yummy. I love pasta and can’t wait to try this, I really enjoyed this post.
I used this recipe along with the Kitchen Aid process for making the dough using the paddle to incorporate the ingredients and then switching to the dough hook to knead. Came out great.
Can you share more about how to use the kitchen aid to mix the dough?
Nikki Krakauersays
Are we able to use the dough hook for pasta? What caveats are there? I’m 74, and use dough hook for bread every week. I’m getting to a point where pasta dough is too much for my R.A.
I just started using my pasta attachment and I exclusively use the dough hook for the dough. It is amazing how it goes from bits and pieces into a perfect ball!!
Knead it with the hook until it looks like kneaded bread dough. Then, do easy kneading adding more flour as you go by hand. Spritz with water if needed.
This was my first time making pasta and this recipe made it easy to do! The detailed instructions and step by step photos made it easy to follow. I'm so happy with the way the pasta turned out and I can't wait to make it again!
Hi Courtney, I'm sorry it didn't turn out! It could be a difference in the brands of flour we're using, or even the size of the eggs can come into play too. I would suggest adding a few drops of water to moisten the dough. Keep adding a few drops at a time until the dough isn't crumbly. Or you could even use a spray bottle and spray one spray at a time so you're controlling the amount of water you're adding to the dough. Let me know if that helps.
Would you mind adding water into the actual recipe since it part of the ingredient list, even if some may not need it? Mine also was too crumbly and hard. I ended up having to add 1/4 to 1/3 of a cup to make it workable and to go through the KitchenAid attachments. I followed the directions precisely even measuring the all purpose flour to 300g. I never could add a dusting of more flour for handling.
Does high vs low altitude make a difference in this recipe? Also, does dry climate vs humid climate make a difference? If they do, could you add it the recipe? Thanks.
i Haven't made this receipe yet, but I'm planning too. I was wondering why you kneaded the dough by hand and didn't use the standmixer with the dough hook for kneading? Is that just a personal preference, or does it affect the final product?
This was my very first time making pasta ever. I asked Santa for the pasta attachments for my KitchenAid, but I only got up the nerve to try them out today! The instructions and tips were really helpful, as was the video. I actually used the KitchenAid to mix and knead the dough. It all came out really well! I made a garlic cream sauce, cooked the fettucine and added shrimp to the last minute of the boil. I am so happy!
Whoops, forgot to say...my grandparents came to New York from Palermo, and I was raised with Italian spoken in our home and wonderful, simple but delicious food. Making fresh pasta means a lot to me! (My married name is Conwell--my mother's maiden name was Cavarretta, my grandmother's was Gatto!)
Very cool! It must've been an amazing childhood, living in New York, and growing up Italian! My uncles and dad immigrated to Montreal in the 60's and then made their way west to Vancouver where they ended up settling and where I was born and raised. Thanks again Susan- loved connecting with you!
This recipe was so easy to follow, i made fettuccine noodles tonight and served it with copycat Olive Garden Alfredo
Sauce. I doubled the recipe, and had to google the conversion factor for cup to gram which does not convert cleanly. Luckily, I have a kitchen scale that does grams. I have to say that the dough had me a little concerned as it was not as clean as it was in your photo, but i went with it, again following your instructions and it turned out just great. I finished the noodles about an hour before i was ready to make dinner, so i just left them sit out in nests with a little flour. When i was ready to cook dinner, i just added the nest to salted boiling water , stirring for only a couple of minutes. They were delicious!!!!
Making tonight! I have pretty weak upper body strength. Do I have to knead the dough, or can I use my kitchen aid dough hook attachment instead? Looks great! Can’t wait to try…
Hi Olivia! Thanks for stopping by. Did you end up making the pasta? I've never tried this with the dough hook, but I think it would be possible. Let me know!
Hi! How many cups are in 300g of all purpose flour? I looked up the conversion and have seen a couple of different answers. I do have a kitchen scale but not sure how to measure flour on the scale in a bowl? Zero then weigh or how do you suggest I know how much flour to eggs to use for US conversion into cups? Thanks!
Trisha and Pina,
It is a good practice in your kitchen to use your scale to weigh each mixing bowl when it is dry and empty. If your mixing bowls are "plastic" or "melamine", you can use a permanent marker to write the weight of each bowl on the bottom or on a side.
King Arthur and most flour makers give you the weights of a cup of their all-purpose flour. If your countertop scale allows you to set the mixing bowl on it and then zero the scale, you can add just the amount of flour that your recipe calls for.
I’ve always wanted to make homemade pasta and thought what better way to pass a quarantine day. Picked up the attachments (curbside pick from BestBuy) and spent the afternoon making pasta with my 13 year old daughter. We had so much fun. The recipe, step by step guide and video were great and helped us a bunch. We made three batches (I kneaded 2 batches by hand and made 1 batch with the dough hook. Both ways produced great dough.). we made spaghetti and fettuccine style pasta with the attachments. A little clumsy at first but we got the hang of it and laughed at ourselves making a mess of the kitchen and trying to hold onto long sheets of pasta. We made sauce and meatballs too and made dinner drop offs to grandparents and neighbors. Everyone loved the homemade pasta!! The questions and posts from others were helpful too. Thank you for sharing your recipe, video and tips. We needed something creative to do to pass the rainy quarantine day and this was perfect.
This was PERFECT! I made fettuccine and my whole family loved it. I did use the KA mixer to make the dough - the KA site has some info about it. I would like to make a "heartier" noodle like a bucatini so I guess using the spaghetti attachment would work, but what number thickness would you recommend?
Hi Robin! I wouldn't store it in the refrigerator overnight. I would freeze it even if for overnight. And then throw straight into the boiling water from frozen.
Hi Katrina! For lasagna sheets, I would make them the same as the recipe states in terms of thickness, For cooking time, this pasta cooks very quickly. Only a few minutes in boiling water, and they are done.
I made you a lovely recipe for the family. And used my pasty gadgets for my KitchenAid. I did use the bowl to create the pasta, but with the remaining flour are used my hot Little hand. And it was a beautiful yellow. Did exactly as you said threading it through the smooth pastor gadget. And then use the cutting gadget. For the sizes I went from size 2, four, and six, after six it got so thin that I got scared. Anyway we ate it for the family. I needed to do to helpings of your recipe, but then I made too much. So 1 1/2 helpings for a big family. Thank you so much I appreciate it.
Hi, Thought I would tell you that I’m using your recipe a lot now. I really love it. I’m getting so brave and I’ve got to number seven thickness. And I’m starting to colour it using spinach. It came out a lovely Pea Green, although it wasn’t quite as bright when I cooked it. But your easy recipe is opened up a whole new world for me. Thank you from me and from my family. x
Hi Jacquie that makes me so happy! Yes the possibilities are really endless with this recipe! Thank you so much for following along. You're the best!
-Pina
Wow! Such a great recipe for first time pasta makers! We got the pasta attachments for Christmas. This was our first time making pasta ever and it turned out great with this recipe!
I love this recipe so much, I thought I’d give it a try with my 10 and 12 year old nephews. Turns out they love it too! They said that running the pasta through the machine was “so satisfying”. Then they each ate a huge bowl! Definitely a family favourite in this house!
Thanks so much Darren! Rolling the pasta through the machine is definitely very satisfying - glad you, your nephews (and maybe your wife?) enjoyed the dish!
Buon Appetito!
-Pina
Maybe this is a silly question and sorry if I missed it; once you make the dough, how long do you cook it? Don’t want to ruin my fresh pasta and I imagine it’s not long. Thanks
Deborah, Atlanta
We've used this recipe many times and love it! Do you think you could stop after kneading the dough (wrap the ball) and put it in the fridge to then cut and cook the next day?
Hi Traci, thanks so much! I'm so glad you like it.
I think you could do that- just try to get the dough to come to room temp before you roll it out and cut it.
Let me know how it goes!
-Pina


Emma Stewart says
Thanks for the tip about kneading on a room temperature surface - this made a big difference to my pasta which I would normally work on a marble countertop. Took less time and effort to get to the right consistency.
Alma Beatrice says
Thanks so much for sharing amazing pasta recipe! I love homemade pasta but I’ve never made it home but have eaten homemade and it’s so yummy. I love pasta and can’t wait to try this, I really enjoyed this post.
Lauren Heys says
Hello, I was just wondering if there was a reason you didn’t mix and knead the dough using the dough hook on your kitchenaid.
Pina says
Hi Lauren! It's just a personal preference - it's the way I learned 🙂
Susan says
I used this recipe along with the Kitchen Aid process for making the dough using the paddle to incorporate the ingredients and then switching to the dough hook to knead. Came out great.
Pina says
So glad you liked it Susan!
-Pina
Stephanie says
Can you share more about how to use the kitchen aid to mix the dough?
Nikki Krakauer says
Are we able to use the dough hook for pasta? What caveats are there? I’m 74, and use dough hook for bread every week. I’m getting to a point where pasta dough is too much for my R.A.
Pina says
I've never tried it with the dough hook but people told me they have used the dough hook to knead the dough with this recipe and it came out great!
Dawn Davenport says
I just started using my pasta attachment and I exclusively use the dough hook for the dough. It is amazing how it goes from bits and pieces into a perfect ball!!
Ljk says
I ha e MS and need machine to knead, also
Lynda Naatz Richter says
Knead it with the hook until it looks like kneaded bread dough. Then, do easy kneading adding more flour as you go by hand. Spritz with water if needed.
Ronnie DiOrio says
I use half semolina. Does work better for me.
Pina says
Thanks Ronnie! Yes, using semolina will give it a grittier texture for sure (nice for the sauce to cling to!!)
Sonia says
This was my first time making pasta and this recipe made it easy to do! The detailed instructions and step by step photos made it easy to follow. I'm so happy with the way the pasta turned out and I can't wait to make it again!
(Review provided by friend of pinabresciani.com)
Pina says
Thank you Sonia!! Glad you enjoyed your pasta
Wenda says
I have the old kitchenaid stand mixer pasta maker attachment with the pasta dies for macaroni, flat noodle, spaghetti. Would this recipe work?
Pina says
Hi Wenda! Is it something like this? https://www.kitchenaid.com/countertop-appliances/stand-mixers/attachments/p.gourmet-pasta-press.ksmpexta.html
If so, it seems to be more of an extruder. For extruded pasta a semolina and water dough is best that is mixed into a wet sand-like consistency, not a firm dough like this one. The extruder needs to be able to push through the dye easily without getting jammed.
Courtney says
My dough was way too crumbly and wouldn’t stay together for me to kneed. 🙁 what am I doing wrong?
Pina says
Hi Courtney, I'm sorry it didn't turn out! It could be a difference in the brands of flour we're using, or even the size of the eggs can come into play too. I would suggest adding a few drops of water to moisten the dough. Keep adding a few drops at a time until the dough isn't crumbly. Or you could even use a spray bottle and spray one spray at a time so you're controlling the amount of water you're adding to the dough. Let me know if that helps.
MD says
Would you mind adding water into the actual recipe since it part of the ingredient list, even if some may not need it? Mine also was too crumbly and hard. I ended up having to add 1/4 to 1/3 of a cup to make it workable and to go through the KitchenAid attachments. I followed the directions precisely even measuring the all purpose flour to 300g. I never could add a dusting of more flour for handling.
Does high vs low altitude make a difference in this recipe? Also, does dry climate vs humid climate make a difference? If they do, could you add it the recipe? Thanks.
Janelle says
i Haven't made this receipe yet, but I'm planning too. I was wondering why you kneaded the dough by hand and didn't use the standmixer with the dough hook for kneading? Is that just a personal preference, or does it affect the final product?
Just curious
Pina says
Awesome! Let me know how it turns out! It was honestly just a personal preference. No specific reason 🙂
Susan Conwell says
This was my very first time making pasta ever. I asked Santa for the pasta attachments for my KitchenAid, but I only got up the nerve to try them out today! The instructions and tips were really helpful, as was the video. I actually used the KitchenAid to mix and knead the dough. It all came out really well! I made a garlic cream sauce, cooked the fettucine and added shrimp to the last minute of the boil. I am so happy!
Pina says
Hi Susan! So happy it turned out well for you. Love the idea of kneading with the KitchenAid too! Your pasta sounds delicious!
Susan Conwell says
Thank YOU, Pina! I'm glad I used your recipe and guidance for my first try!
Pina says
Amazing! Thanks again Susan 🙂
Susan Conwell says
Whoops, forgot to say...my grandparents came to New York from Palermo, and I was raised with Italian spoken in our home and wonderful, simple but delicious food. Making fresh pasta means a lot to me! (My married name is Conwell--my mother's maiden name was Cavarretta, my grandmother's was Gatto!)
Pina says
Very cool! It must've been an amazing childhood, living in New York, and growing up Italian! My uncles and dad immigrated to Montreal in the 60's and then made their way west to Vancouver where they ended up settling and where I was born and raised. Thanks again Susan- loved connecting with you!
Holly M says
How long do you cook the pasta?
Pina says
Not long - just a few minutes. It definitely doesn't take as long to cook as packaged store-bought pasta.
Amata P says
This recipe was so easy to follow, i made fettuccine noodles tonight and served it with copycat Olive Garden Alfredo
Sauce. I doubled the recipe, and had to google the conversion factor for cup to gram which does not convert cleanly. Luckily, I have a kitchen scale that does grams. I have to say that the dough had me a little concerned as it was not as clean as it was in your photo, but i went with it, again following your instructions and it turned out just great. I finished the noodles about an hour before i was ready to make dinner, so i just left them sit out in nests with a little flour. When i was ready to cook dinner, i just added the nest to salted boiling water , stirring for only a couple of minutes. They were delicious!!!!
Pina says
Thanks Amata! So glad you liked it 🙂
Olivia says
Making tonight! I have pretty weak upper body strength. Do I have to knead the dough, or can I use my kitchen aid dough hook attachment instead? Looks great! Can’t wait to try…
Pina says
Hi Olivia! Thanks for stopping by. Did you end up making the pasta? I've never tried this with the dough hook, but I think it would be possible. Let me know!
Trisha says
Hi! How many cups are in 300g of all purpose flour? I looked up the conversion and have seen a couple of different answers. I do have a kitchen scale but not sure how to measure flour on the scale in a bowl? Zero then weigh or how do you suggest I know how much flour to eggs to use for US conversion into cups? Thanks!
Pina says
Hi Trisha! I just measured it out and 300g of all purpose flour is approximately 2 cups plus 2 1/2 tbsp of all purpose flour.
Norman says
Trisha and Pina,
It is a good practice in your kitchen to use your scale to weigh each mixing bowl when it is dry and empty. If your mixing bowls are "plastic" or "melamine", you can use a permanent marker to write the weight of each bowl on the bottom or on a side.
King Arthur and most flour makers give you the weights of a cup of their all-purpose flour. If your countertop scale allows you to set the mixing bowl on it and then zero the scale, you can add just the amount of flour that your recipe calls for.
Jennifer Jarreau says
I’ve always wanted to make homemade pasta and thought what better way to pass a quarantine day. Picked up the attachments (curbside pick from BestBuy) and spent the afternoon making pasta with my 13 year old daughter. We had so much fun. The recipe, step by step guide and video were great and helped us a bunch. We made three batches (I kneaded 2 batches by hand and made 1 batch with the dough hook. Both ways produced great dough.). we made spaghetti and fettuccine style pasta with the attachments. A little clumsy at first but we got the hang of it and laughed at ourselves making a mess of the kitchen and trying to hold onto long sheets of pasta. We made sauce and meatballs too and made dinner drop offs to grandparents and neighbors. Everyone loved the homemade pasta!! The questions and posts from others were helpful too. Thank you for sharing your recipe, video and tips. We needed something creative to do to pass the rainy quarantine day and this was perfect.
Pina says
Thank you so much Jennifer! Glad you enjoyed the recipe.
Sharyn says
This was PERFECT! I made fettuccine and my whole family loved it. I did use the KA mixer to make the dough - the KA site has some info about it. I would like to make a "heartier" noodle like a bucatini so I guess using the spaghetti attachment would work, but what number thickness would you recommend?
Robin Ryan says
Hello...can you make this pasta ahead of time and store in the refrigerator over night? Thank you!
Pina says
Hi Robin! I wouldn't store it in the refrigerator overnight. I would freeze it even if for overnight. And then throw straight into the boiling water from frozen.
Katrina says
I am making pasta sheets for Lasagna do I need to do anything differently? ie: thickness and cooking time?
Pina says
Hi Katrina! For lasagna sheets, I would make them the same as the recipe states in terms of thickness, For cooking time, this pasta cooks very quickly. Only a few minutes in boiling water, and they are done.
Judith says
Hi Lina, when estimating serving size, how many grams of flour per person would you suggest please? Thanks
Pina says
Hi Judith! Thanks for your question. I would say 100-150g of flour per person. Hope that helps, and happy pasta-making!
xo Pina
Jacquie says
I made you a lovely recipe for the family. And used my pasty gadgets for my KitchenAid. I did use the bowl to create the pasta, but with the remaining flour are used my hot Little hand. And it was a beautiful yellow. Did exactly as you said threading it through the smooth pastor gadget. And then use the cutting gadget. For the sizes I went from size 2, four, and six, after six it got so thin that I got scared. Anyway we ate it for the family. I needed to do to helpings of your recipe, but then I made too much. So 1 1/2 helpings for a big family. Thank you so much I appreciate it.
Pina says
This makes me so happy Jacquie! Making homemade pasta is a labor of love! Glad you enjoyed the recipe.
xo, Pina
Jacquie says
Hi, Thought I would tell you that I’m using your recipe a lot now. I really love it. I’m getting so brave and I’ve got to number seven thickness. And I’m starting to colour it using spinach. It came out a lovely Pea Green, although it wasn’t quite as bright when I cooked it. But your easy recipe is opened up a whole new world for me. Thank you from me and from my family. x
Pina says
Hi Jacquie that makes me so happy! Yes the possibilities are really endless with this recipe! Thank you so much for following along. You're the best!
-Pina
Clare says
Wow! Such a great recipe for first time pasta makers! We got the pasta attachments for Christmas. This was our first time making pasta ever and it turned out great with this recipe!
Pina says
Thanks so much Clare! Isn't the attachment amazing?! Glad it worked out and happy pasta making!
Jean doig says
Can you knead your dough in the kitchen aid vs hand?
Pina says
Hi Jean! I haven't tried it but a few commenters on here have tried it and said kneading in the kitchenaid with the dough hook works well!
Darren says
I love this recipe so much, I thought I’d give it a try with my 10 and 12 year old nephews. Turns out they love it too! They said that running the pasta through the machine was “so satisfying”. Then they each ate a huge bowl! Definitely a family favourite in this house!
(Review provided by friend of pinabresciani.com)
Pina says
Thanks so much Darren! Rolling the pasta through the machine is definitely very satisfying - glad you, your nephews (and maybe your wife?) enjoyed the dish!
Buon Appetito!
-Pina
Tina Anderson says
Can the dough be refrigerated overnight prior to making it into pasta?
Deborah B says
Maybe this is a silly question and sorry if I missed it; once you make the dough, how long do you cook it? Don’t want to ruin my fresh pasta and I imagine it’s not long. Thanks
Deborah, Atlanta
Traci says
We've used this recipe many times and love it! Do you think you could stop after kneading the dough (wrap the ball) and put it in the fridge to then cut and cook the next day?
Pina Bresciani says
Hi Traci, thanks so much! I'm so glad you like it.
I think you could do that- just try to get the dough to come to room temp before you roll it out and cut it.
Let me know how it goes!
-Pina